DIY pots are easy, cheap, and give you a LOT of options. Plastic bottles are great for terrariums, but if it's something you plan on transplanting later, I do not recommend it. If you do plan on transplanting it later on, there's a couple routes you can go.
Newspaper pots are great for things like vegetables that you will be putting in the garden. Like peat pots, simply get the paper wet and break it up a little when it's time to stick it in the garden. The newspaper can also be a handy dandy little fertilizer (not the best though, but it's safe at least).
Tin can pots are something easy to do that can be used over and over again. There's a few things you need to do for the prep of this project. Make sure there are no jagged edges on the inside of the can- sometimes when you take off the lid, a small piece is left behind that can cut you. You can take that off by using small metal cutting scissors (I recommend the ones you can find in the jewelry section of a craft store) or a metal file. The next thing you need to do is poke a few small holes in the bottom for drainage. There's a few ways to do this, but however you do it, just be careful.
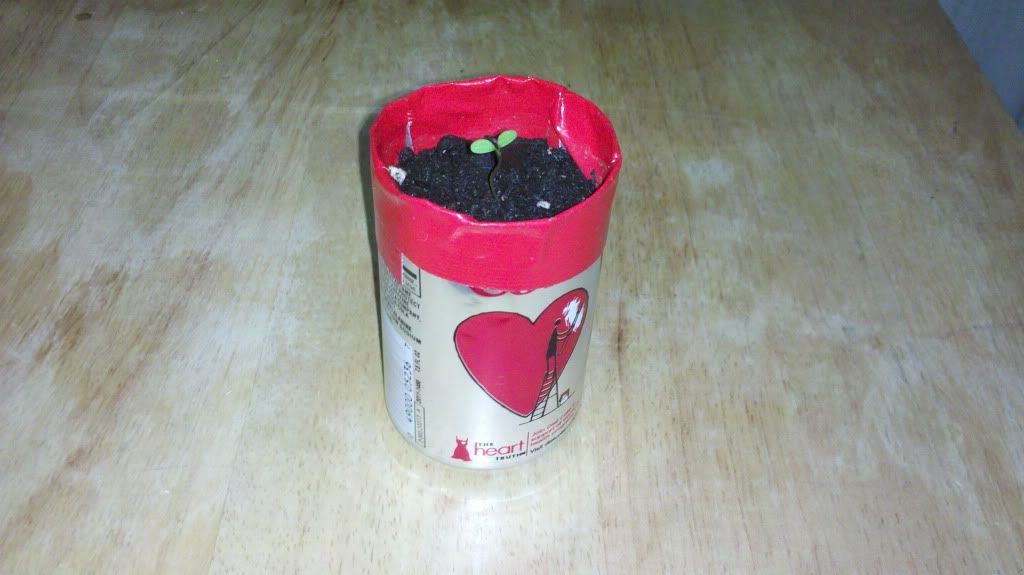
Soda can pots (pictured above) are similar to the tin can pots, but require a little more prep. As you can see from the photo, I used some metal cutting scissors to take off the top of the can. I cleaned up the edges a little and then covered it with some snazzy red duct tape. I also poked some holes in the bottom of the can for drainage.
When it comes down to it though, you can use just about anything as a recycled pot. I've seen pots made out of kitchen pots, coffee mugs, bowls, a toolbox (I wish I took a photo of that one, it was awesome!), and many others. Just remember, if you use something that you can't make drainage holes in, don't over water your plants and look out for rotting from sitting water. Also, don't forget to re-pot your plant when it out grows its pot, otherwise you will kill your plant.
One last note- if you make a pot out of a soda can, be careful when you cut the top off. Small metal shards that fall are hard to find, and it's easy to cut yourself if you're not being careful (I should know, I'm like the queen of clumsy). And, the cute duct tape can be found all over now a days (Target, Walmart, Michael's, Hobby Lobby and more).
I'm a Girl Scout leader (and volunteer), and this is my blog chronicling what my scouts have done and what we will be doing... plus some extras for fun. To my troop parents- if your Girl Scout tells you she did "stuff" this week, here's what we really did. To my fellow troop leaders- need ideas? We have plenty of those you can take!
Showing posts with label recycled. Show all posts
Wednesday, March 21, 2012
Sunday, January 29, 2012
Snack bag!
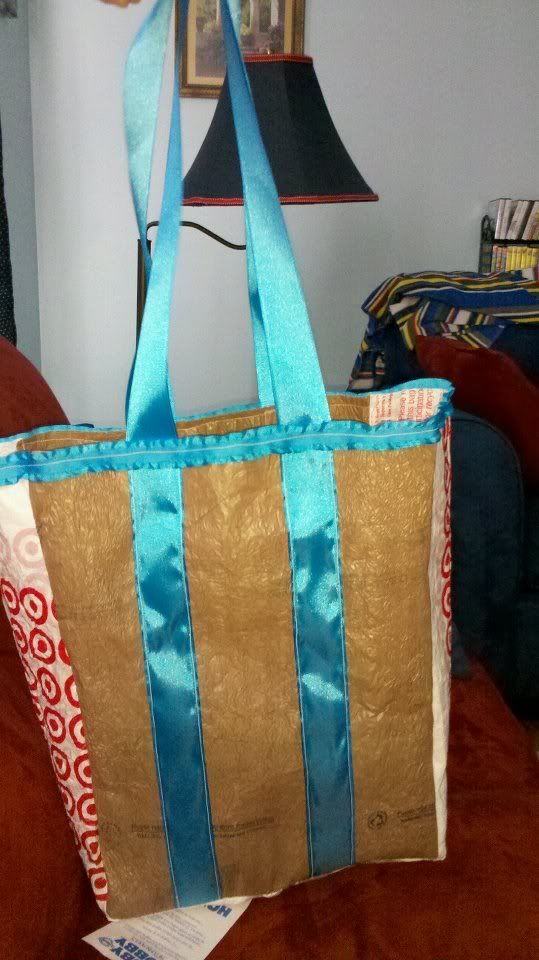
I've had several requests to make a post on how I made our snack bag. Our girls love the bag and are constantly asking when it will be their turn for the bag. I've also had adults see other versions of the bag and ask how I made it. Going with our recycled theme, our snack bag is exactly that, recycled! Some people know it as a meta bag, I just call it the bag I made with all my extra plastic bags that were sitting in the closet collecting dust (meta bags is much shorter though).
What you will need:
12 plastic shopping bags
2 spools of ribbon
parchment paper
iron and ironing board
How to:
1. Cut off the handles and bottoms of the plastic bags, then make a cut up one side of the body of the bag
2. Lay 6 of the bags flat, lined up as best you can, between 2 pieces of parchment paper (this is to keep the plastic from sticking to your iron and ironing board)
3. Using the wool setting on your iron, "fuse" your bags together. It will take about 10-15 seconds for the plastic to melt, but do not lay the iron on a spot for that long. Make passes over the plastic. Lift up your parchment paper occasionally to check. For the best result, flip your material over half way to finish the process. Repeat this process with the second set of bags (for your tote bag, you will need both pieces of "fabric"). ***Iron the plastic in a well ventilated area. The bags will create some nasty fumes***
4. Once you have your "fabric," you can cut and sew it like you would normal fabric. I used a simple tote bag template- a bottom, 2 sides, and front/back pieces. For added strength for our handles, instead of sewing a square and x pattern where the handles meet the bag top, I sewed the handles all the way down the bag, where they joined at the bottom, on the inside seam (see the picture). I still did make the handy dandy x at the tops seeing as how our bag would be carrying things like heavy juice boxes
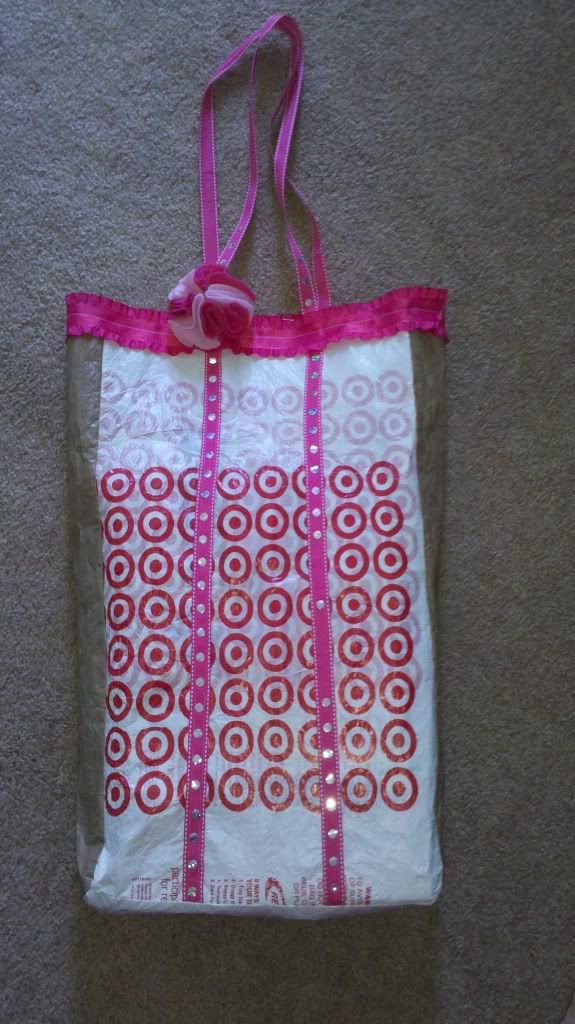
5. Since it is very hard to get perfectly straight edges with this material, you may want to create a trim for the top of the bag. I took some ribbon and sewed it across the top of the bag to conceal the edge
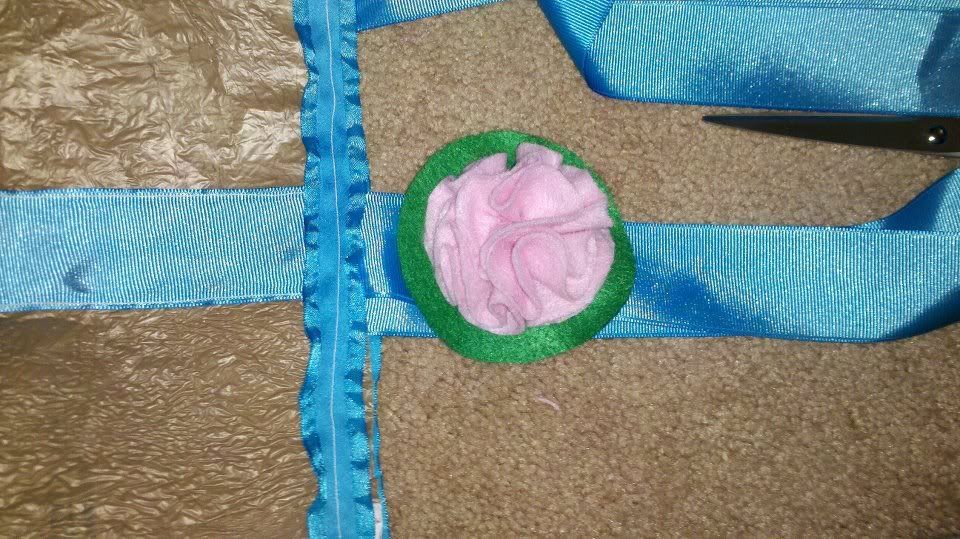
I love those little extras that you sometimes get when you buy a bag or purse (it's my surpressed girly side). Our girls seem to love them too, so I added a little something to our bag.
That flower really is very easy to make!
What you will need:
1 sheet of felt (2 of you want to make a background)
1 lid (I used a lid from a tomato sauce jar)
needle and thred
pins
1. Using the lid, trace and cut 6 circles on your piece of felt (I recommend using a pencil to trace it as it is easy to hide later on)
2. Take one circle and fold it in half. Fold it in quarters in an "S" shape- fold one quarter forwards and one quarter backwards
3. Put a pin through the top of your folded piece of felt. Repeat this for the remaining 5 pieces
4. When you are done, using a needle and thread, join the pieces together at the bottom of the quarters (near the point)
5. Once the thread is secured, remove the pins to release the "petals." They can be arranged however you want
6. If you are adding a base (like in the picture), cut a separate piece of felt in a circle larger than the ones you made for the petals, and secure it using glue or a needle and thread
7. Flowers can be sewn, glued, or pinned onto whatever you are using it for
Question: Are these bags sturdy?!
Answer: YES!!! These bags are VERY sturdy. We have been using our snack bag for 4 months and it shows no signs of giving out any time soon!
Question: Can I make other types of bags this way?
Answr: YES!!! I have made gift bags, purses, and coin purses using this "fabric." For the gift bags though, I only use a layer of 4 bags (8 total) since it usually will be reused as another gift bag. I also only attach gift bag handles at the top of the "fabric" since once again, it's not going to be used for heavy duty stuff.
Question: Are they machine washable?
Answer: On the COLD cycle, yes, but, DO NOT put it in the dryer!!!
Question: What about bags that have logos on it?
Answer: You don't have to use them. You can always cut them out, or cut them out and arrange them to your liking. I really love the Target bullseye, so I use it often. I also take bags from various stores to create little collages on my bags to make a picture or spell out something.
Question: So, these are pretty cheap to make, right?
Answer: Yup! I find ribbon on sale all the time or in the dollar sections of stores. So, essentially, that's really the only thing you have to buy. Most of us will get those plastic bags with purchases at some stores, and throwing them out can be so wasteful. This is a great way to made good use of those bags while helping out the environment and future shopping trips!
Question: How long does it take to make one of these tote bags?
Answer: Start to finish, roughly 30-45 minutes, depending on how proficient at sewing you are.
Question: What about the scraps? I thought you said we were recycling?
Answer: Save them! If you accidentally make a hole while ironing, you can use the scraps to make a patch. If you want to get REALLY crafty, you can use the scraps to make your own handle!
This past Christmas, 95% of my gifts bags were these bags (the other 5% was for my husband who asked that I not package his stuff in anything "girly"). It was a HUGE hit with my family. I now have all of my friends and family saving their plastic bags for me so I can make more.
What you will need:
12 plastic shopping bags
2 spools of ribbon
parchment paper
iron and ironing board
How to:
1. Cut off the handles and bottoms of the plastic bags, then make a cut up one side of the body of the bag
2. Lay 6 of the bags flat, lined up as best you can, between 2 pieces of parchment paper (this is to keep the plastic from sticking to your iron and ironing board)
3. Using the wool setting on your iron, "fuse" your bags together. It will take about 10-15 seconds for the plastic to melt, but do not lay the iron on a spot for that long. Make passes over the plastic. Lift up your parchment paper occasionally to check. For the best result, flip your material over half way to finish the process. Repeat this process with the second set of bags (for your tote bag, you will need both pieces of "fabric"). ***Iron the plastic in a well ventilated area. The bags will create some nasty fumes***
4. Once you have your "fabric," you can cut and sew it like you would normal fabric. I used a simple tote bag template- a bottom, 2 sides, and front/back pieces. For added strength for our handles, instead of sewing a square and x pattern where the handles meet the bag top, I sewed the handles all the way down the bag, where they joined at the bottom, on the inside seam (see the picture). I still did make the handy dandy x at the tops seeing as how our bag would be carrying things like heavy juice boxes
5. Since it is very hard to get perfectly straight edges with this material, you may want to create a trim for the top of the bag. I took some ribbon and sewed it across the top of the bag to conceal the edge
I love those little extras that you sometimes get when you buy a bag or purse (it's my surpressed girly side). Our girls seem to love them too, so I added a little something to our bag.
That flower really is very easy to make!
What you will need:
1 sheet of felt (2 of you want to make a background)
1 lid (I used a lid from a tomato sauce jar)
needle and thred
pins
1. Using the lid, trace and cut 6 circles on your piece of felt (I recommend using a pencil to trace it as it is easy to hide later on)
2. Take one circle and fold it in half. Fold it in quarters in an "S" shape- fold one quarter forwards and one quarter backwards
3. Put a pin through the top of your folded piece of felt. Repeat this for the remaining 5 pieces
4. When you are done, using a needle and thread, join the pieces together at the bottom of the quarters (near the point)
5. Once the thread is secured, remove the pins to release the "petals." They can be arranged however you want
6. If you are adding a base (like in the picture), cut a separate piece of felt in a circle larger than the ones you made for the petals, and secure it using glue or a needle and thread
7. Flowers can be sewn, glued, or pinned onto whatever you are using it for
Question: Are these bags sturdy?!
Answer: YES!!! These bags are VERY sturdy. We have been using our snack bag for 4 months and it shows no signs of giving out any time soon!
Question: Can I make other types of bags this way?
Answr: YES!!! I have made gift bags, purses, and coin purses using this "fabric." For the gift bags though, I only use a layer of 4 bags (8 total) since it usually will be reused as another gift bag. I also only attach gift bag handles at the top of the "fabric" since once again, it's not going to be used for heavy duty stuff.
Question: Are they machine washable?
Answer: On the COLD cycle, yes, but, DO NOT put it in the dryer!!!
Question: What about bags that have logos on it?
Answer: You don't have to use them. You can always cut them out, or cut them out and arrange them to your liking. I really love the Target bullseye, so I use it often. I also take bags from various stores to create little collages on my bags to make a picture or spell out something.
Question: So, these are pretty cheap to make, right?
Answer: Yup! I find ribbon on sale all the time or in the dollar sections of stores. So, essentially, that's really the only thing you have to buy. Most of us will get those plastic bags with purchases at some stores, and throwing them out can be so wasteful. This is a great way to made good use of those bags while helping out the environment and future shopping trips!
Question: How long does it take to make one of these tote bags?
Answer: Start to finish, roughly 30-45 minutes, depending on how proficient at sewing you are.
Question: What about the scraps? I thought you said we were recycling?
Answer: Save them! If you accidentally make a hole while ironing, you can use the scraps to make a patch. If you want to get REALLY crafty, you can use the scraps to make your own handle!
This past Christmas, 95% of my gifts bags were these bags (the other 5% was for my husband who asked that I not package his stuff in anything "girly"). It was a HUGE hit with my family. I now have all of my friends and family saving their plastic bags for me so I can make more.
Subscribe to:
Posts (Atom)